
Station Name: HADLEIGH[Source: Nick Catford]
Hadleigh Station Gallery 2: 1911 - 9.6.1956 old17.jpg)
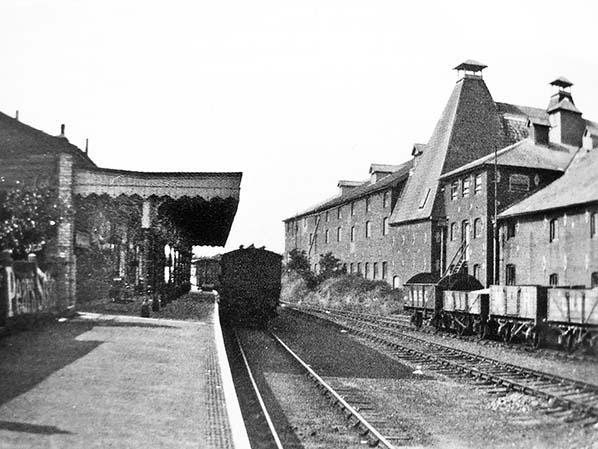
In this and other views a passenger train can be discerned at the station platform. This photograph, from the signal box, is also from 1911 but either later the same day as the previous views or within a day or two. There has been some movement of wagons in the background, centre right, and a tank locomotive can be seen, apparently shunting wagons, to the left of the engine shed. The track at extreme right is the headshunt which runs up to the water tower.
Reproduced under creative commons licence © National Railway Museum and SSPL old19.jpg)
The locomotive facilities at Hadleigh as photographed in 1911. On the right is Gayford's maltings while partially visible at extreme left are the goods shed and the chimneys of the station building. The locomotive faculties closed in February 1932, coinciding with the withdrawal of the branch passenger service. The shed, which contained a pit, just visible, was fairly unusual, but not unique, for a branch terminus in that it was double-ended and sat astride a through road. A short distance beyond the shed was once a wagon turntable which connected a short siding serving another maltings which is out of view to the right in this photograph. By this date the turntable had been moved to the run round loop with the siding crossing the shed road on a flat crossing. The cattle wagons on the right stand on a siding installed at some point subsequent to 1884. Quite what is stacked upon the coaling stage and to the right of the track is unclear; the logical answer is coal, of course, but although it was common practice for locomotive firemen to break down large lumps of coal, those seen here appear excessively large. The stacking is very neat and almost smooth sided. The bin, bottom left, was probably for sand and used for locomotive sandboxes but if so the sand would need to kept perfectly dry and how that was achieved here, if it is a sand bin, is unclear.
Photo from Roger Griffiths collection and Reproduced under creative commons licence © National Railway Museum and SSPL old21.jpg) The approach to Hadleigh station in 1911, the engine shed and coal stage is seen to the right with the goods shed to the left. There were actually two adjacent goods sheds; the siding seen here passed through the first shed and on into the second. A canopy can be seen projecting from the second shed giving weather protection for road vehicles. The coal siding is seen to the left of the shed.
Reproduced under creative commons licence © National Railway Museum and SSPL old22.jpg)
A view from beneath Hadleigh's trainshed towards the end of the line in 1911. The GER recorded a number of changes to sidings and facilities at Hadleigh over the years but one fairly major change, evident in this view, is the elimination of the platform ramp according with an additional, or extended, goods dock. The gates which had stood at the top of the ramp remain, however, as does what is thought to have been some sort of signal lamp on the gatepost. This view shows all too well the somewhat cramped and awkward layout of Hadleigh station, especially when locomotives needed to run round their trains. It is known that the run round of passenger trains was often performed by reversing the entire train out of the station. The four-plank open wagon in front of the camera has its number duplicated on the upper end plank. The Great Western Railway had a penchant for this practice but the size and style of the numerals do not look very GWR, so the wagon's identity must remain unsolved. A number of tree trunks can be seen on the left; presumably they will be sawn up and transported away by rail or, alternatively, had arrived by rail for a purpose unknown. The crane, visible on the left, was quoted by British Railways in 1904 as being of 5 ton capacity, but it was not uncommon for cranes to be changed as needs changed. Either way, there was a crane on this particular spot at least as early as 1884. The structure on the right, looking like a miniature signal box, was a shunting cabin and contained a 6-lever ground frame. The dock also acted as a cattle dock and cattle pens are seen at the far end.
Reproduced under creative commons licence © National Railway Museum and SSPL
 A view along the platform at Hadleigh looking towards the end of the line sometime in the late Pre-Grouping (pre 1923) era. As always, the adjacent maltings dominate the scene. Some passenger stock sits at the platform while beyond at least one goods wagon can be seen. There were cattle pens and dock siding beyond the passenger station and the vehicle visible appears to be a cattle truck. It was once normal to see goods wagons of various companies on 'foreign' territory and a good example of this can be seen on the right. From right to left there stands a London & North Western Railway open wagon and next to it a Midland Railway open wagon. The lettering on the third wagon cannot be discerned with any certainty but the vehicle appears to be a Great Eastern Railway 4-plank open wagon. The fourth and last vehicle is a London, Brighton & South Coast Railway tarpaulin or 'Hi-bar' wagon. These wagons conveyed goods which required protection from the weather and dated from a time when fully enclosed vans were less common. The wagons, obviously, were covered by a tarpaulin stretched over a bar which pivoted through quadrants on each end of the body. In this instance the bar is visible in the lowered position and the quadrant on the near end of the wagon is also visible. The final variation of this type of wagon was the 'Clayhood'; used, as the name implies, for china clay traffic. They remained in service until the late twentieth century when more modern vehicles replaced them.
Photo from John Mann collection old6.jpg)
A train has arrived at Hadleigh and awaits its locomotive running round for the return journey. The trainshed was removed at the end of WW1 and has been replaced by a flat canopy which extends in front of the goods shed. The centre track was once available as a run-round loop but has been truncated and a buffer stop installed. At this time it was possible for locomotives to draw forward and run round via points connecting to the siding on the right, but with a carriage stabled ahead of the locomotive and a van apparently straddling the points it would appear some shunting would be necessary. The train comprises a GER Worsdell brake third from the 1882 - 1884 period and what appears to be a six compartment composite. Both are six-wheelers. This photograph has been used in at least one book, in which it is described as being from the GER period. However, the lettering and numbering on the carriages suggests, under magnification, LNER days, which would date the photograph to the 1923 - 1932 period. In addition the locomotive, an unidentified 0-6-0T, carries no GER numberplate thus again suggesting LNER days. The train is typical of rural East Anglia during the first half of the 20th century, using antiquated stock cascaded onto quiet backwaters. The carriage stabled just ahead of the locomotive is a 27ft brake third to a design dating from the Massey Bromley period but probably built during Worsdell's tenure. The station name-board is of GER origin.
Photo from John Mann collection old7.jpg)
Photographed at Hadleigh, posing with crew and staff is ex-GER class F4 2-4-2T No.147E. This suffixed number was a temporary expedient applied by the LNER prior to its renumbering scheme of 1924, during which this locomotive became LNER No.7147 and therefore the photograph dates from shortly after the 1923 Grouping. The locomotive has already lost its GER numberplate and the impression left by it remains clearly visible on the side of the bunker. She became LNER No.7193 in 1946 and then, as a class F5 member, she went on to serve as British Railways No.67193 until November 1957. The GER 2-4-2Ts were intended for London suburban work and while some remained in the London area, others were dispersed far and wide including to Scotland. Many, but not all, of the wanderers retained the destination board brackets on the smokebox door and one is visible in this photograph, the other being obscured by the driver. Some of the railway staff can be identified. Porter/guard Sid Morseley is third from left and is seen with a shunting pole. Fourth from left is porter Charlie Barber. There is no record of No. 147 being allocated to Ipswich shed but it might have worked in on a special.
Photo from Jim Lake collection old2.jpg) Closed to passengers as an economy measure in 1932 as a result of the depression, Hadleigh was one of those stations which at first glance looked as though it was still open to passengers many years later. In this view from 1949 even the station nameboard is still in situ. The giveaways that this is during the goods-only period are the van at the platform and evidence of nature slowly taking over. The numbering of the vans on the goods shed road tells us this photograph dates from British Railways days. In the last years of the branch much of the goods traffic was coal, so the presence of a fair number of vans confirms the photograph was taken earlier. The maltings, right, are still standing today and have been smartly converted for residential use. Otherwise the maltings and what remains of the station are now hemmed-in by modern housing. Note the wagon turntable on the right, this was originally sited on the shed road but was moved to the run round loop with a siding running at right angles into one of the maltings.
Copyright photo from John Alsop collection old10.jpg)
Hadleigh station forecourt in 1949. Although the station building was single storey there was an upper floor providing very cramped accommodation for the station master until 1918. One of two goods sheds is seen to the right with the goods and cattle dock to the left
Photo
from John Mann collection
old7a.jpg) Hadleigh on Saturday 9 June 1956 saw the departure of the Railway Enthusiasts Club's brake van tour disturb the peace. Very few confirmed details of this tour exist but it is known to have operated from Liverpool Street to Ipswich via Saffron Walden, Bartlow and Colchester, returning direct from Ipswich. The jaunt along the Hadleigh branch involved three goods brake vans, suggesting only a small contingent of participants. This may suggest the journey between Liverpool Street and Ipswich and return was via service trains; if so the outward leg via Saffron Walden would have required some very careful planning. The brake van part of the tour would of course have commenced and ended at Ipswich. One thing that is certain is the locomotive used on the Hadleigh branch, Class J15 0-6-0 No. 65459 which had obviously been spruced-up for the occasion. Commencing life as GER No.561 in 1906, she was an Ipswich locomotive in 1956 but ended her career at Stratford from where she was withdrawn in February 1960.
Photo by RC Riley Click here for Hadleigh Station Gallery 3: 3.9.1956 - 1972
|
 Home Page