
[Source:
Nick Catford and Darren Kitson]
end_old4.jpg)
The 3.36pm service to Bartlow is seen at Audley End in September 1956, one month before the demise of the G5 class locomotives and their antiquated push & pull sets. They were replaced by N7 class locomotives and slightly-less-antique sets. The locomotive is 67322 and the set comprises E61441E (next to locomotive) and E63423E (the driving trailer facing the camera). The smaller physical size of the driving trailer is apparent. Note the barrows and trolleys lined up regimentally on the platform. No doubt these had accrued quite a mileage over the years trundling back and forth between branch platform, main line platforms and, perhaps, the goods shed.
Copyright photo by HC Casserley end_old5.jpg) Another view of the 3.36pm service to Bartlow in September 1956. The centre track is the run-round loop; both it and the running line, left, joined the up main line, and access to the branch from the down main was via a ladder crossing (i.e. a crossover from down to up main followed by a further set of points from up main to branch). Beyond the latter points, a further set gave access from up main to Barnard Bros siding. There was no direct access from the Saffron Walden branch to any part of the goods yard. The run-round loop also had a trap siding, to protect the main line, which ended abruptly at Audley End viaduct. The trap siding ran ahead from the points which formed part of the run-round facility, as did the continuation of the loop to the main line junction. These points also gave access to the track on the right which was 1017ft long and single-ended. It terminated a hundred-or-so yards before Fighting Cocks bridge. Note the trap points with their rather sharp turnout. Click here to see the cab in greater detail.
Copyright photo by HC Casserley end_old6.jpg)
To complement the similar, but closer, image by Peter Jamieson, we again see the 3.36pm to Bartlow at Audley End in September 1956. Audley End main line station is behind the photographer. As with other branch lines, especially those with wayside halts in the region, it is today difficult to appreciate that scenes such as that above once existed within the London commuter area. Just down the road, as it were, was the quaint Thaxted branch which had already bowed out when the above scene was photographed. At least the Saffron Walden branch actually served somewhere, unlike the Thaxted branch which terminated in the middle of nowhere. The building seen above had, as described elsewhere, a central waiting shelter flanked by an office and a storeroom. It has been said that the office was for use by the stationmaster but as he had facilities in the main line station building this claim seems a little odd. It is more likely that the branch platform office was used by a parcels clerk or a porter. The office was on the left as we look at the above image and the storeroom on the right. A further mystery surrounds quite why a diminutive storeroom would require a fireplace or stove. The gas supply to Audley End station was not from Saffron Walden, as might be assumed, but from Newport gasworks. The Newport Gas Company's works was adjacent to Newport railway station and on the down side of the line.
Copyright photo by HC Casserley
end_old12.jpg)
Bridge 2111 located 68 chains from Audley End Junction, seen above in September 1959. Almost half way to Saffron Walden, in which direction this view is looking, it was 48ft high. A few chains behind the camera, the line emerged onto a high embankment and crossed Fulfen Slade. It was in this cutting where a train took refuge from enemy aircraft attack during WWII; one of two such reported incidents on the branch, the other occurring near Ashdon. Bridge 2113, a little nearer Saffron Walden, was also of three-arch construction but spanned a shallower cutting. Painters Bridge, No.2122, between Saffron Walden and Bartlow, was a third three-arch structure on the branch. Bridge 2111, however, was unique to the branch in that in 1938 and for reasons unknown its piers were encased in concrete. It also had unusual stepped parapets and both features can be seen above. This area is generally considered to be part of East Anglia and as a result is assumed, by those not in the know, to be topographically flat. As the above image and accompanying text shows, this is far from the case.
© National Railway Museum and SSPL, reproduced under creative commons licence end_old11.jpg)
Audley End branch platform on an unknown date during the BR period. A BR totem is neatly positioned above the waiting shelter entrance and the curious running-in board is in the left foreground. The waiting shelter was, in fact, an open-fronted shelter flanked by a storeroom and an office and thus could be called a station building in its own right. Further confirmation for passengers of where they were is provided by the nameplate on the ex-GER platform seat and also on the casement glass of the gas lamp. The building in the left background is Audley End goods shed which was served via a wagon turntable. The short journey from Audley End to Saffron Walden was quite spectacular; after squealing round the curve seen above, trains crossed what was the A11 (today the B1383) on Fighting Cocks bridge, No.2107, and then negotiated a number of deep cuttings and a high embankment as well as crossing Fulfen Slade (a tributary of the River Cam) before entering a shallow cutting on the approach to Saffron Walden. None of these features now exist.
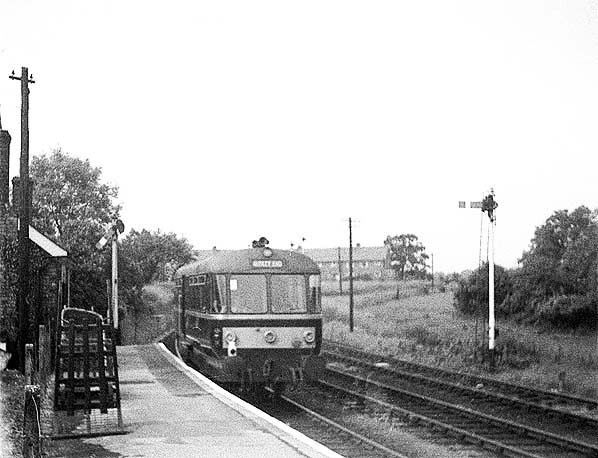
Photo by John L. Smith end_old9.jpg) This image came with the date 13 October 1968 which is, of course, incorrect. It is more likely to be 13 October 1963, a Sunday. A Waggon und Maschinenbau Donauworth, to quote the company's full and correct title, railbus has the 'right away' from Audley End's branch platform with a service for Haverhill. Haverhill services, which involved a reversal at Bartlow, had been reintroduced by BR not long before the end of steam on the Saffron Walden branch. Journey time varied between 24 and 30 minutes. In the final timetable all Sunday services beyond Saffron Walden, of which there were only two, ran to and from Haverhill but did not call at Ashdon Halt. The German railbuses became easy to identify, when no numbers were recorded, following the introduction of yellow warning panels and overhead warning flashes. That seen above is E79960, with its small yellow warning panel and a flash either side thereof, but one positioned slightly higher than the other. This particular railbus had warning flashes prior to the yellow panel being applied, the latter occurring in the early summer of 1962. Note the signalling is a mix of upper and lower quadrant types. Audley End main line station is off the image to the left. The branch platform remained gas-lit to the end. The van on the right reminds us of an incident soon after final closure of the branch. The junction with the main line at Audley End was removed but a van remained in the branch platform (or on the loop, it is not known which) and was apparently forgotten about by the authorities at Cambridge. Eventually an English Electric Type 3 diesel (Class 37) was sent from Cambridge via Bartlow and along the disused branch to collect it. The rather large running-in board on the left is curious. It is a BR Eastern Region blue example and large enough to have borne the additional wording "Change for Main Line Trains" or similar. However, as far is known it only ever bore the Audley End name. The running-in boards on the main line platforms bore the additional legend 'Change for Saffron Walden' so the large size of the board on the branch platform might be explained by the possibility that it was merely of a standard size produced for Audley End station as a whole.
Copyright photo from Colour-Rail 213153 end_old10.jpg)
Audley End branch platform in April 1963. A railbus has just arrived and a reasonable number of passengers are present. The majority of services on the branch ran as a shuttle between Audley End and Saffron Walden. On weekdays these shuttles ran frequently by the standards of other branch lines and from early morning until late evening there could be as many as three per hour, this frequency being punctuated only by the occasional jaunt to Bartlow or Haverhill. The Sunday service was rather sparse, running only from early afternoon until early evening but then, of the few branch lines which had a Sunday service, this service level was fairly typical. The service between Audley End and Saffron Walden was well used and with the introduction of railbuses overcrowding became a problem at peak times. Unlike on the Braintree branch, where there was a similar problem, BR never saw fit to replace Saffron Walden's railbuses with DMUs on a regular basis. A half-hearted plan to purchase railbus trailers was deferred on the pretext of 'see how things go and if traffic levels warrant them' but, as history shows, the scheme was never heard of again. The railbus seen above is E79963. This one had a smaller yellow warning panel and one of its overhead warning flashes further round the bodyside to clear the vehicle's data panel*. E79963 was on duty the day the passenger service was withdrawn but by then the warning flashes seen above had been removed and, following a brief period carrying none, replaced by a single flash at the top of the offside windscreen at each end. All five Waggon und Maschinenbau railbuses carried warning flashes at various times for reason of their diagrams taking them beneath 25kV overhead wires. Photographic evidence of all 22 BR passenger railbuses suggests only one other was to receive flashes, this being AC Cars No. SC79979. *These panels were the forerunner of the familiar blue and white stickers on locomotive cabsides. Before these stickers were introduced, data panels were applied by transfer. They gave details of vehicle length, width, tare weight (unladen weight), seating class and so on. The vehicle type was also stated and in the case of the railbuses it was given as 'DRB'. Data panels were generally at two diagonally opposite corners but the precise position varied; the Wickham railbuses, for example, had them on the bodyside panels a little way in from the corners.
Photo from John Mann collection
 In June 1964 a diesel railbus departs Audley End for either Saffron Walden or Bartlow. The railbus is E79963, having by this time gained an overhead warning flash in its offside windscreen in place of its previous and oddly positioned flashes below the waist. Note the ex-GER lower quadrant starting signal. All other signals at Audley End, other than Audley End fixed distant just beyond Fighting Cocks, were by this time upper quadrant types. Above the railbus the bracket signal which controlled the platform road and loop can just be seen, the latter being the centre of the three tracks visible. The track on the right was a siding, connecting via points trailing in the up direction. Audley End Junction signal box contained 60 levers and when the branch, goods yard and siding from the down main line were intact only one of those 60 levers was spare. The signals visible above are, left to right, Nos.37, 15, 13 and 38. Signal 38 controlled the loop in the down direction, while the siding was controlled by No.25, a ground signal and not visible above. Three months after this photograph was taken, E79963 would have the dubious honour of operating the final passenger service on the branch.
Photo by Bevan Price end9.jpg)
Audley End branch platform on a rainy day in July 1970, some six and a half years after the branch finally closed and almost two years after the track was lifted. Note the by-now-dilapidated luggage trolleys on the platform. On the left the porch of the main line station building can be seen: a neat structure built as a nod to Lord Braybrooke. Unlike today, when it would be full, the car park is quiet. Perhaps it was a Sunday. The main point of interest is the running-in boards from the main line platforms, having been dumped here following replacement by the then-invading black and white corporate identity versions. It was thought 'Change for Saffron Walden' was painted out after the branch closed but obviously this was not the case. After closure of the Saffron Walden branch, the boards did continue to have some relevance as passengers could still change for Saffron Walden. This was not, however, by train but by the rail replacement bus: Premier Travel Ltd service 59 which operated to and from the station forecourt. Audley End station was also served by the Eastern National Omnibus Co service 301 from Bishop's Stortford. Both the running-in boards seen above have survived; one just down the road at the Audley End Miniature Railway (see below) and the other
at Mangapps Railway Museum, Burnham-on-Crouch Photo by John Mann
 Home Page Home Page
|

end14.jpg) From the
From the 