Station Name:BISHOPSGATE LOW LEVEL
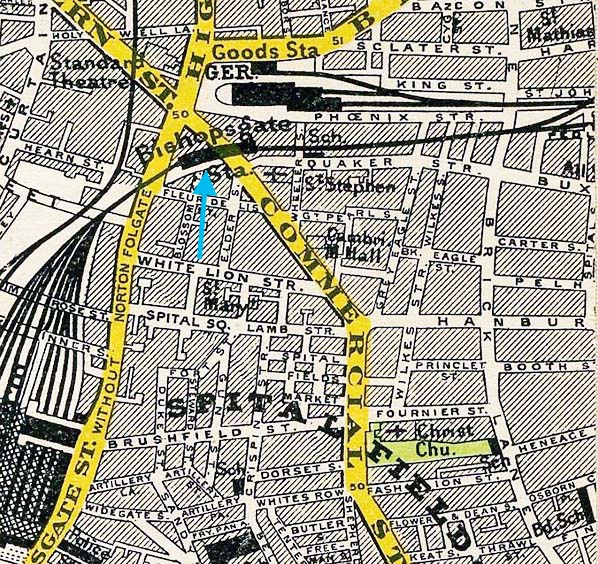
Bishopsgate Low Level Station Gallery 1 c1904 - c1949 old1.jpg) Bishopsgate Low Level showing the line curving south-westwards beneath Commercial Street on its approach to Liverpool Street. At the time of writing this was the only known photograph of this area of the station. The platforms are, from left to right, Down Main, Up Local and Down Local. The Up Main platform was further east, beyond Wheler Street and on the south side of the line, in other words behind and to the left of the photographer in this view. The station lost its trainshed in 1902, replaced by the GER canopies as seen here. The apparent poor provision of lighting is of note. There is a row of gas lamps near the top of the wall on the left but later another row was provided lower down. This may suggest alterations to the station were incomplete at the time of the photograph but we do know the date is 1904 or shortly afterwards, thanks to some of the posters on the left. Click here for more details. Photo from JE Connor collection 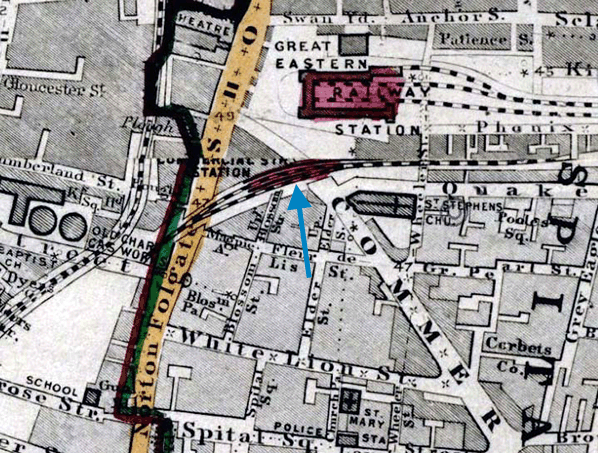 Stanford's map of London for 1872 shows the station as Commercial Street. This was never the intended name.
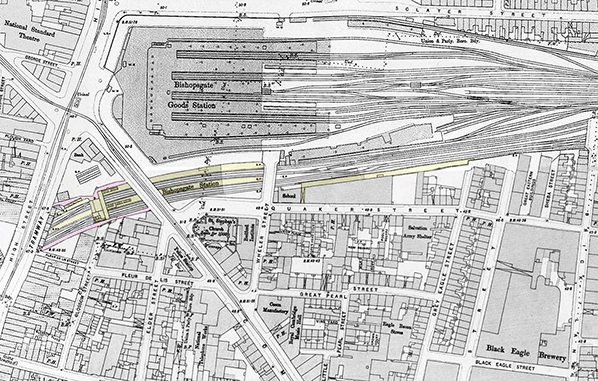
1896 1:1056 map shows the layout of Bishopsgate Low Level station and the adjacent Bishopsgate Goods Station. Platforms and station buildings are highlighted in yellow and the access footways linking Commercial Street and Shoreditch High Street are highlighted in pink. There was access for cars and cabs with a station yard on the north side. The long building in the yard is an excursion booking office. The main station building straddles the line on a bridge to the west of Commercial Street. The building comprises the booking office, waiting room and refreshment room. From there steps go down to the local platforms to the north of the formation and the Down main line platform which forms an island with the Up local platform. The Up Main line platform is to the east of Wheler Street with entrance steps to Quaker Street at its east end. This platform had no booking office and was primarily intended for alighting passengers only. The extent of the station canopies is shown in a darker shade of yellow. There were no buildings on the Up Main line platform other than a gents' urinal. A number of waiting rooms were built into arches at the rear of the down local platform. The Suburban lines and booking office are not shown although a short section of open cutting immediately north of the booking office indicates where they run. Click here for a larger version.
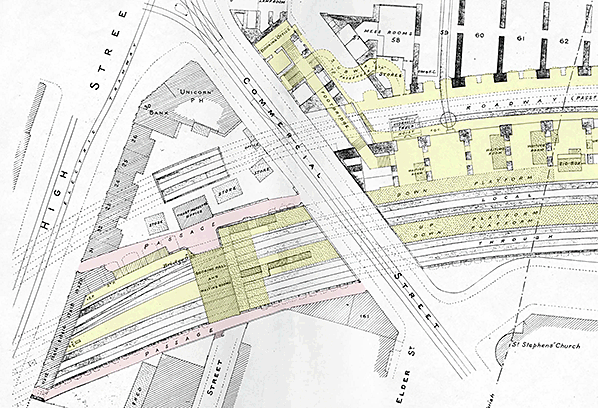 1910 plan of Bishopsgate station clearly shows the layout of both the original booking office and platforms and the 1891 Commercial Street entrance and routes to the Suburban line platforms and the original Down local platform. Note the various waiting rooms and other facilities located between the Up Suburban and Down Local platforms. A lot of the features shown in this plan are part of the goods station in the two levels above. The room adjacent to the 1872 booking office is a ticket inspector’s office. Click here for a large version.
old3.jpg) On 9 May 1912 GER Class M15 2-4-2T No. 577 passes the Up Main platform of Bishopsgate Low Level with the 1.45PM Liverpool Street - Gallions service. Just visible on the locomotive's bunker is a Gallions destination board. The train is formed of typical 4 - and 6-wheel suburban stock of the period. The disc fitted to the locomotive's bunker is a route indicator; these were of various colours according to route but unfortunately comprehensive records of these discs appear not to have survived. The bridge in the background carries what is now Braithwaite Street over the line. This was a renaming, in 2010, of what had been the northern end of Wheler Street in honour of the engineer John Braithwaite. The Low Level station's other platforms were beyond the bridge and comprised Up and Down Local and Down Main platforms. The former High Level station is to the right. The platform seen here was sometimes referred to as Quaker Street, probably because of its entrance location, and has an abundant supply of gas lighting which, note, is of two different types fixed at two different levels. The upper level lamps are suspended while the lower level lamps are of the vertical bracket type. The reason for this seeming overkill is not known although it is possible the more modern suspended lamps, which would have used incandescent mantles, are in the process of replacing the others. The GER M15 Class locomotives were not particularly successful, being prone to excessive coal consumption. No. 577, fitted with condensing gear, was new in April 1907 and as LNER Class F4 No. 7577 was withdrawn in January 1931. However some Class F4 members along with some of the Class F5 variant managed to soldier on to see British Railways. The final F4 bowed out in 1956 and the final F5 in 1958 along with the final F6. While some members ended their days in the London area, most had been displaced by Class N7 and dispersed to East Anglian sheds from where they pottered around on goods and local passenger workings. A few made a name for themselves during wartime when they worked armoured trains and in this guise could be seen as far away from London as Scotland.
Photo by Ken Nunn old4.jpg)
Another view of the Up Main line platform at Bishopsgate this time looking east from the Up signals probably in the first decade of the 20th century. The distinctive ridge-and-furrow awning with saw-tooth valance that protected much of the platform is seen here. The platform is overshadowed by Bishopsgate goods depot which is seen on the right. The three east end crossovers are seen in the middle distance.
Photo from JE Connor collection old5.jpg) This view of Bishopsgate goods and Low Level station is undated but is probably from the late 1920s to early 1930s period. Bishopsgate (High Level) goods depot dominates the centre of the image, with the Low Level station visible immediately below on the tracks curving south-west towards Liverpool St. The Low Level station's island platform would appear to be extant at this time, although it could merely be the footprint left following its removal. The number of wagons on the tracks leading into the High Level is indicative of the volume of goods carried by rail during this period, although decline had already set in following the First World War as reliable road motor transport began to take over, often using surplus ex military vehicles. Crossing the low level tracks, lower right centre, is Wheler Street bridge (now Braithwaite Street at this point) with the offices and factory of Sharpe's Glass Merchants to its right on the south side of a railway, To the west of Wheler Street, Commercial Street crosses the line and beyond that the bridge that housed the original Low Level booking office is seen. An access road running around the south and west side of Bishopsgate goods station is seen. The Commercial Street booking office was in arches below this road. Click here for a larger and wider version. This view of Bishopsgate goods and Low Level station is undated but is probably from the late 1920s to early 1930s period. Bishopsgate (High Level) goods depot dominates the centre of the image, with the Low Level station visible immediately below on the tracks curving south-west towards Liverpool St. The Low Level station's island platform would appear to be extant at this time, although it could merely be the footprint left following its removal. The number of wagons on the tracks leading into the High Level is indicative of the volume of goods carried by rail during this period, although decline had already set in following the First World War as reliable road motor transport began to take over, often using surplus ex military vehicles. Crossing the low level tracks, lower right centre, is Wheler Street bridge (now Braithwaite Street at this point) with the offices and factory of Sharpe's Glass Merchants to its right on the south side of a railway, To the west of Wheler Street, Commercial Street crosses the line and beyond that the bridge that housed the original Low Level booking office is seen. An access road running around the south and west side of Bishopsgate goods station is seen. The Commercial Street booking office was in arches below this road. Click here for a larger and wider version.old6.jpg) Bishopsgate, formerly Bishopsgate Low Level, station facing east with track work ongoing - pipe laying, probably for drainage on 17 May 1936, after closure and removal of the island platform. The photographer was on what was the Down Local platform and the former Up Main platform can be seen through Wheler Street bridge. This section of Wheler Street is now Braithwaite Street and leads, a short distance to the left, to the Overground's Shoreditch High Street station. Two sets of signals are in the 'Off' (Proceed) position and both have backboards, the purpose of which was to aid sighting. The wall on the left is of interest in that above the arches is what would appear to be a row of carbon arc electric lights. These had been installed in 1893 and a very brief history is given here. Rather dominating the scene is, on the right, of office block of Messrs. Sharpe Brothers, Glass Merchants. This company also had premises at Glyn Road, Clapton, close to the junction with Homerton High Street. Glyn Road is now mainly residential with between-the-wars housing. The office building seen here no longer exists but the factory, part of the roof of which is visible above the bridge, still stood in 2023 and has long since been put to other uses with a much modified roof.
Photo from JE Connor collection old7.jpg)
A view from the former Down Local platform towards Bethnal Green probably taken on the same day as the photo above. Pipe laying, probably for drainage, is ongoing on the site of the former island platform as is, apparently, re-ballasting work. Ahead of the camera is Bridge No. 12, Commercial Street, 34 chains from Liverpool Street, with its ornate cast iron arch. The wall above the arch has received bracing but the reason is unknown. Possibly the bridge had received minor damage during WWI air raids. In September 1915 Zeppelin L13 dropped bombs on Liverpool Street station and its environs and on 6 July 1917 Bishopsgate station was bombed but without casualties or any crippling damage. Surviving records show there were nine WWI bomb incidents in the vicinity of Bishopsgate station of which two were at, or extremely close to, the Low Level platforms. Commercial Street bridge survived the 1949 Shenfield electrification, unlike Wheler Street (now Braithwaite Street) bridge seen here in the background which had to be rebuilt with a flat deck. The bridge preceding Commercial Street, No. 11, was removed in June 1930 and the resulting gap in bridge numbering exists to this day. Bridge No. 11 was that which carried a ticket office and waiting room. It was located at the north end of Blossom Street, behind the camera in this view, and accessed via a staircase. Bishopsgate South signal box can be seen beyond Commercial Street bridge, seemingly hiding rather sheepishly as a result of limited space. There were also waiting rooms located in the arches on the left. Beyond Wheler Street bridge it is just possible to discern the 1 in 70 Bethnal Green bank. The post-mounted circular devices, or which two are visible, are banner repeater signals. These are installed where curves and structures obscure the sighting of the signals they repeat. Such repeater signals at one time abounded in the Liverpool Street area. They take the form of a black bar on a white background disc, the disc partially rotating so the black bar mimics the arm of a regular signal. On the repeater facing the camera in this view the black bar is not visible. Where these repeaters still exist today, the replacement of mechanical signalling has seen them superseded by electronic LED versions,
Photo from JE Connor collection
old8.jpg)
GER shops in Shoreditch High Street in 1939. Between the two parades of shops the arched entrance to Bishopsgate station is seen. This was not the original entrance from Shoreditch High Street. The shops on the right were built by the GER in 1874, prior to their building the footway started alongside the line.
Photo from JE Connor collection old9.jpg) A view facing north-east from beneath the arch of Commercial Street bridge with the rebuilt Wheler Street bridge to the right. This is the site of the west end of Bishopsgate Down Local and island platforms. Surviving records of the Shenfield electrification mention provision of a substation at Bishopsgate and this is assumed to be the building directly ahead of the camera. Cables can be seen emerging just above track level and close examination of the Overhead Line Equipment (OLE) suggests there is a section feeder on the gantry nearest the camera. Wheler Street bridge had to be rebuilt for the electrification work from the original arched form to that seen here. The bridge exhibits evidence of smoke staining which suggests this undated photograph dates from a few years after rebuilding, perhaps during the early 1950s. Much of the track is by now laid with flat bottom rail and colour-light signalling has appeared. The OLE is that installed for the original 1500VDC system. Work had actually started prior to WWII under the auspices of the LNER but as was the case with many things the war halted the work and electric services did not begin until 1949, after British Railways had been created. The electrical part of the work had been contracted to British Insulated Cables which in 1945 became British Insulated Callender's Cables, better known by its trading title 'BICC'. The contract had been drawn-up in July 1939, signatories for the LNER being Nigel Gresley and Robert Inglis. Inglis, incidentally, was to go on to be involved with the Glasgow suburban electrification scheme while Gresley was never to see completion of the Shenfield scheme, he having died in 1941. During the 1960s British Railways decided to standardise on AC electrification at 25kV 50 cycles per second. Due to uncertainties around safety clearances for high voltage AC the Liverpool Street suburban lines, including the Cambridge line as far as Cheshunt, were converted to 6.25kVAC with 25kVAC beyond. This prevailed until 1983 when the Eastern Region changed all its 6.25kVAC lines to the 25kVAC system. As of May 2023 at Bishopsgate and elsewhere in the vicinity some of the original gantries for the DC electrification remain in service. The substation building is also still in existence and can be seen from passing trains. A view facing north-east from beneath the arch of Commercial Street bridge with the rebuilt Wheler Street bridge to the right. This is the site of the west end of Bishopsgate Down Local and island platforms. Surviving records of the Shenfield electrification mention provision of a substation at Bishopsgate and this is assumed to be the building directly ahead of the camera. Cables can be seen emerging just above track level and close examination of the Overhead Line Equipment (OLE) suggests there is a section feeder on the gantry nearest the camera. Wheler Street bridge had to be rebuilt for the electrification work from the original arched form to that seen here. The bridge exhibits evidence of smoke staining which suggests this undated photograph dates from a few years after rebuilding, perhaps during the early 1950s. Much of the track is by now laid with flat bottom rail and colour-light signalling has appeared. The OLE is that installed for the original 1500VDC system. Work had actually started prior to WWII under the auspices of the LNER but as was the case with many things the war halted the work and electric services did not begin until 1949, after British Railways had been created. The electrical part of the work had been contracted to British Insulated Cables which in 1945 became British Insulated Callender's Cables, better known by its trading title 'BICC'. The contract had been drawn-up in July 1939, signatories for the LNER being Nigel Gresley and Robert Inglis. Inglis, incidentally, was to go on to be involved with the Glasgow suburban electrification scheme while Gresley was never to see completion of the Shenfield scheme, he having died in 1941. During the 1960s British Railways decided to standardise on AC electrification at 25kV 50 cycles per second. Due to uncertainties around safety clearances for high voltage AC the Liverpool Street suburban lines, including the Cambridge line as far as Cheshunt, were converted to 6.25kVAC with 25kVAC beyond. This prevailed until 1983 when the Eastern Region changed all its 6.25kVAC lines to the 25kVAC system. As of May 2023 at Bishopsgate and elsewhere in the vicinity some of the original gantries for the DC electrification remain in service. The substation building is also still in existence and can be seen from passing trains.Photo from John Mann collection Click here for Bishopsgate Low Level Station Gallery 2:  Home Page Home Page
|
 When the Great Eastern drew up plans in 1865 to extend their line closer to the City with a new terminus at Liverpool Street, it was decided to build a station on the new alignment adjacent to Bishopsgate to serve those customers who found the old Bishopsgate terminus more convenient.
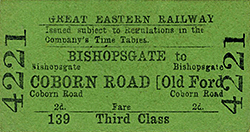 It was soon clear that the Great Eastern’s Metropolitan Extension Lines to Enfield and Walthamstow via Hackney Downs would be completed before Liverpool Street was ready and in order to accommodate a large increase in traffic, the GER decided, in 1870, to open the new Bishopsgate (Low Level) station as a temporary terminus at the earliest opportunity to cater for this additional traffic.
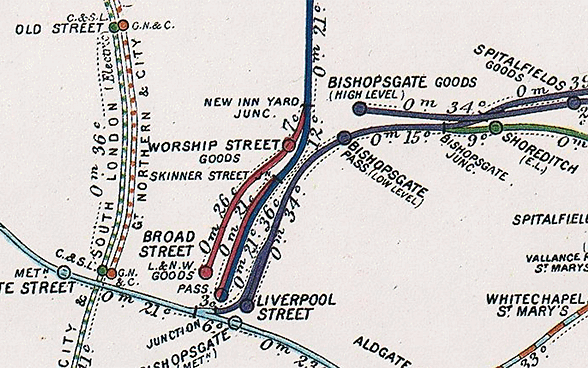
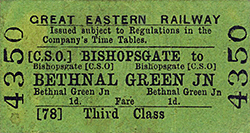
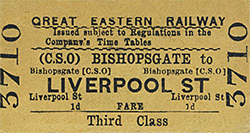
 There has always been confusion over the station name. It was officially called Bishopsgate (Low Level) until closure of the old Bishopsgate terminus in 1875. Some timetables show Bishopsgate (Low Level) while others show Bishopsgate. Tickets usually showed Bishopsgate (Low Level) until 1875.
 Although it was only a short walk between Bishopsgate and Liverpool Street, ticket sales were surprisingly high and eventually the GER decided to build an Up Main line platform. There was insufficient room adjacent to the existing platforms and a new site was chosen to the east of Wheler Street. The plans were approved by the GER in July 1874 and work started immediately. The platform was completed in April the following year and after inspection by Captain Tyler it was opened on 8 May. For much of its length it was covered by a ridge-and-furrow awning with saw-tooth valance. As the platform was intended primarily for disembarking passengers there were no buildings other than a small gents' urinal. There was no booking office with access up a flight of steps to an arched entrance in Quaker Street at the west end.
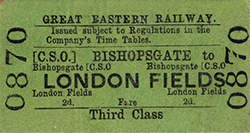
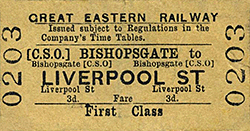
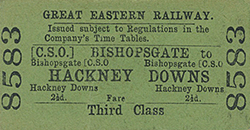 A second station entrance and booking office was opened to serve the new Suburban platforms, by adapting three existing arches in the goods station frontage wall on the north-east side of Commercial Street. The north westernmost of these accommodated the Booking Hall (with Booking Office); the second a Parcels Office; and the third the exit stairs. Having purchased their tickets, entering passengers turned right and descended a double stairway into a sub-surface passageway, past the foot of the exit stairs. Access to the Down platform was by turning left down a few stairs followed by a long snaking subway, which was lined in white glazed brick to make the most of the flickering gaslight illumination. The route to/from the Up Suburban platform was via a footbridge over the suburban lines, which led directly into the passageway. The new Booking Office was referred to as the ‘Commercial Street Office’ and was shown on tickets as CSO. With the new lines came an additional signal box, 'Bishopsgate North’, which only controlled the suburban lines. It was located at the east end of the Down Suburban platform.
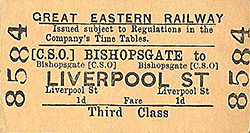 By the turn of the 20th century it was clear the 1872 trainshed required replacing. In 1901/2 a number of contracts were awarded for this work. New and different canopies were eventually provided on the Down local and island platforms.
 From the little available photographic evidence it is known that the 1903 awnings had been removed by around 1925, and it seems likely that those on the Up through platform were taken down at the same time. By 1936 photographs show the island platform itself had also been demolished. The 1872 Booking Office building was also demolished some time c.1925-36. An LNER engineer's site plan drawn in 1938 indicates that the Down local platform was then in course of being demolished.
  Residues of the 1891 Suburban lines platforms can be glimpsed from trains on these lines. The Commercial Street entrance's stairways, passageway and subway are still in situ. However the arches at street level are now largely hidden by hoardings.
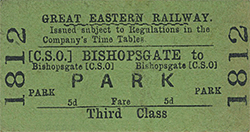
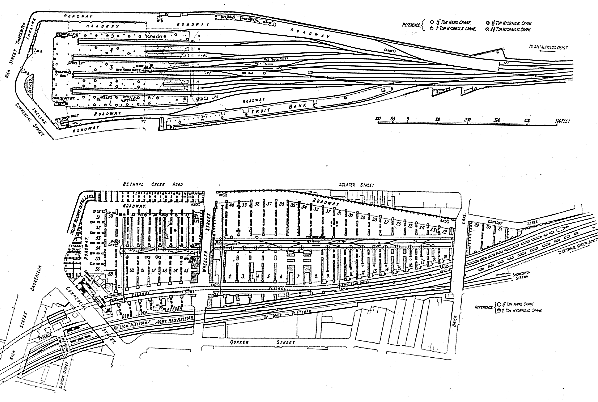 Plan of Bishopsgate goods station upper and lower levels and Bishopsgate Low Level station. Click