
[Source: Nick Catford & Darren Kitson]
Bartlow (Saffron Walden branch platform) Gallery 1: c1930s - April 1963 old10.jpg) Among the oldest available photographs of Bartlow station is this view from the Saffron Walden branch platform along the path to the main station on the Stour Valley line. The main point of interest is the rather peculiar sign; peculiar in that passengers are instructed to 'cross the road'. One may ask ‘what road?’ as the path led only to the forecourt of the main building. The answer is simple; it is merely the terminology used at the time with 'road' being used for a number of situations be it a path, railway track or highway. 'Road' is still used by the railways in the 21st century when describing tracks or routes, for example 'goods road' or 'learning the road'. A modern equivalent of the sign seen above might say ‘Along the path’ or ‘Across the path’. The date of the photograph is unclear. Henry Casserley began his photographic collection in the 1920s and other photographic evidence tells us the sign had disappeared by BR days. It is likely to have been removed during WWII when any sign, and not just on the railways, which could give away a location or which gave directions to another location, was removed for security reasons. Considering these points, the photograph almost certainly dates from pre-war LNER days. The fence on which the sign was mounted was adjacent to the waiting shelter and survived closure. It is visible on a number of photographs. The oil lamp midway along the path also survived, in
use, until closure. Copyright photo by HC Casserley   1903 1:2,500 OS map The Stour Valley line station is seen centre right. In front of the main station building a footpath leads to the Saffron Walden branch platform. The small waiting shelter is seen at the end of the footpath. Two signal boxes are shown, one to the west of Bartlow Junction on the far left, the other on the Stour Valley line to the east of the road bridge.
old12.jpg) Bartlow in June 1951 with Class C12 4-4-2T blowing off as it awaits departure with the 5.46pm to Audley End. This was shortly before the G5s and push-and-pull trains were introduced, running round being necessary countless times per day until then. The C12 class originated with the Great Northern Railway and is generally associated with pottering around Lincolnshire byways. A handful of the class were sent south to Cambridge prior to WWII to replace the G4 0-4-4Ts (not to be confused with the G5s) at Saffron Walden. They could also be seen on pilot work at Cambridge and on the Stour Valley line from time to time. That photographed at Bartlow is No.67375, a locomotive often photographed on the Saffron Walden branch. She was sent to Cambridge from Louth and been photographed a number of times bearing 'Louth' on her bufferbeam but by the time the above photograph was taken she bore 'Cambridge'. BR shed codes and plates had, then, only recently been introduced and No.67375 was yet to acquire a shedplate. After being replaced by G5s and push-and-pull sets, No.67375 went to March and then Bury St Edmunds. Withdrawal came in April 1955. The train comprises a Gresley brake third and a Gresley composite. The brake third, next to the locomotive, is E86309E but the composite is unidentified. At this time five passenger carriages were kept at Saffron Walden, usually formed into 2 x 2-car sets with one carriage spare. One of the carriages at Saffron Walden with the C12s was an ancient clerestory roofed vehicle; described by some authors as being ex-Great Central, it was in fact ex-Great Eastern luggage composite E63525. It was presumably withdrawn in 1951 so probably never carried an E suffix. At Bartlow in 1951 the GER running-in board still stood and would continue to do so for a further five years. The points in the foreground led to the trap siding; this was later removed and trap points installed. Click here for a close up view of the oil lamp and running-n board.
Copyright photo by HC Casserley old11.jpg) A relatively ‘Triffid-free’ panorama of Bartlow branch platform in April 1955. The platform is seen almost in its 210ft entirety; the start of the ramp at the near end is just visible on the extreme right. The subsidence was yet to be dealt with. All four of the platform's oil lamps are visible but that on the right is minus its casement, suggesting that end of the platform was already out of use as it was not required by the 2-car push-and-pull sets by then in use. Soon after this photograph was taken the trap siding, in the foreground, was removed and replaced with trap points. The white posts on the left were the signal wire route, and in the left foreground is what appears to be a points / signals interlock mechanism for the run-round loop.
Copyright photo by RM Casserley old14.jpg) Bartlow station was situated in a rather secluded and quite heavily wooded area as is evident in the summer 1955 image above. On this occasion Class G5 0-4-4T No.67322, in reasonably smart condition, waits at Bartlow with one of the push-and-pull sets. In contrast to the high frequency Audley End - Saffron Walden section, only a handful of trains continued to Bartlow where most offered reasonable connections with Stour Valley services. The latter themselves were hardly frequent but nevertheless offered a better service than was provided on many other branch lines. Away from the intensity of the Audley End section of the branch, the leisurely amble to Bartlow was put to good use for cleaning out the locomotive fire on arrival. This accounts for the pile of ash lying in the 'six foot' (the railway term for the space between adjacent tracks). The track on the right was a run-round loop. Beyond the points opposite the end of the platform in the right background and indicated by the shunt signal was a trap siding leading from the loop. Behind the camera were trap points on the loop while originally both loop and running line continued to Bartlow Junction to join the Stour Valley line which, at that point, had become two tracks for the up and down Stour Valley platforms. In later years the layout was altered so that the two tracks seen above merged before the junction; the junction itself thus became the single-lead type with the Stour Valley Cambridge platform loop.
Photo from Cambridge University Railway Club archives old9.jpg) This most delightful view dates from August 1956 and shows Class G5 0-4-4T No.67322 waiting in the Saffron Walden branch platform with a push-and-pull set. As with most photographs of Bartlow station, the secluded, wooded and fairly hilly nature of the location is evident. In 1968 these assets proved attractive to Columbia Films when, with the help of some bamboo, the branch around the curve to the right was transformed into what was supposed to look like a Malayan jungle for the filming of 'The Virgin Soldiers'. This view shows part of the simplified junction layout described with another image. The Stour Valley line and the main part of Bartlow station are to the left. Bartlow Junction signal box, a 39-lever effort, was looking decidedly shabby in 1956. After closure it was never demolished and survives at the time of writing deep in the ever-encroaching woods. Perhaps 'survives' is the wrong word as the increasingly dilapidated box collapsed in 2010. There was once another box, Bartlow Station, at the Haverhill end of the Stour Valley platforms (The Cambridge direction is behind the camera) but this was abolished by the LNER in 1926 and its functions were taken over by the Junction box. Colour photographs of Bartlow Junction box taken after closure show that it did receive a repaint at some point. No doubt the work was undertaken immediately prior to closure, this seemingly being the usual course of events in BR days!
Copyright photo from Colour-Rail BRE2029 old13.jpg) A G5 and push-and-pull train at Bartlow in May 1956 with Bartlow Junction signal box on the left. The platform now has an Eastern Region running-in board but the signal post appears to be missing its arm. Perhaps it was at this time the signal was given an upper quadrant arm. A landslide has not occurred in front of the locomotive; the illusion is created by bushes at the end of the platform, ash between the tracks and the camera angle. Despite Ashdon being an unstaffed halt and fare collection arrangements from there being somewhat makeshift, branch trains, including these push-and-pull sets, were not, nor could they be, worked on the conductor-guard principle. This was in total contrast to, for example, the Mildenhall branch, with its ground-level halts, for which a large quantity of rolling stock was converted over a period of 35 years. For a time in 1953 one of the G5s, No.67269, carried the unofficial name 'Lucy Belle' on her smokebox door but quite who Lucy was is not recorded.
Photo from John Mann collection old12.jpg) Bartlow branch platform looking towards the junction and Cambridge sometime in later BR days. The loop appears to be little used and the pile of ash has gone, suggesting that the view dates from after railbuses had taken over. The Eastern Region running-in board and totems provide a touch of modernity as does the concrete fence corner post. The wooden fence adjacent to the shelter once bore a sign directing passengers to the main part of the station, which was along the pathway to the right. There was an oil lamp, perhaps two, along the path but it is said that at one time a porter with a lantern would accompany passengers along the path during the hours of darkness. This was probably more to do with collecting fares from people who had entrained at Ashdon than anything else. Note the point rodding in front of the platform; the route was quite lengthy and on a curve so quite some effort must have been required in the signal box to pull the levers.
photo from John Mann collection old14.jpg) An undated view of Bartlow branch platform with a Waggon und Maschinenbau railbus in attendance. As the railbus still has whiskers, the period will be summer 1958 to early 1962. The arm on the tall signal post in the background was Bartlow down home while below it on the same post, but hidden by the railbus, was the Bartlow Up Starter arm. The ground signal on the right was for the trap points, which are just visible to the right of the railbus buffer. The person walking towards the camera is, one suspects, an accomplice of the photographer. It is not known if the railway employee is the driver, guard or a member of the station staff. He is probably the latter as he appears to be having a casual natter with somebody on the railbus.
photo from John Mann collection
old15.jpg) Possibly taken at the same time as the earlier undated 'whiskered railbus' image, from this track level view we get a good comparison of the repaired and non- repaired sections of platform. The trap points and related ground signal pose for the camera on the right. Some people get confused between trap and catch points. Trap points are found on sidings and loops, their purpose being to protect running lines from runaways or locomotives / trains attempting to leave the siding or loop without the authority of the signalman. Catch points are found on running lines and usually where there is a gradient. Their purpose is to prevent, or catch, runaway vehicles. The latter was a very real problem in the days before the continuous automatic brake became standard and the catalyst for this change was the Armagh disaster of 1899. With both types of point, the idea is to derail the errant vehicles, and points are laid out in such a way as to derail away from any adjacent running lines. Trap sidings protect running lines in the same way as trap points, the difference being that trap sidings are not intended to derail. They have the added advantage of being able to serve as a headshunt if required and also as a refuge.
photo from John Mann collection 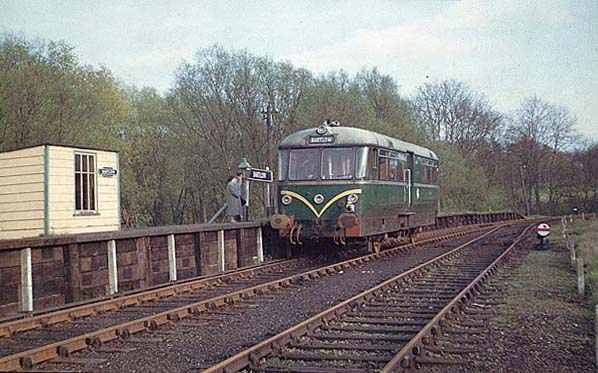 On Saturday 8 April 1961 a diesel railbus waits at Bartlow prior to returning to Audley End. The tail lamp is in place but the rear destination blind has not been changed. Photographic evidence suggests this was common practice on the branch. Under magnification it can be seen there are actually two people standing on the platform; their stance suggests they are not about the board the railbus so perhaps they are seeing off a friend or relative who has visited. The wooded area around Bartlow station was known for its plethora of bird life and the various sounds they made. With this, a pleasant spring day, a rustic railway platform, no loudspeakers spluttering out ‘We regret to announce......’ type messages, what more could one ask for?
old13.jpg) In April 1963, and with Bartlow Junction signal box in the background, E79963 awaits departure for Audley End. The photograph is taken from the disused section of platform and the wide gap as a result of subsidence between track and disused section of platform is evident in the foreground. As is also evident above, Bartlow station sat upon relatively high ground amid rolling countryside but the village itself sits in the valley of the River Granta. As a result, ground movement was a problem for the railway at Bartlow throughout its existence. The Stour Valley line passed through Bartlow on an embankment which necessitated two underbridges in the village. From the above image can be judged how close the former trap siding, replaced with trap points by this time, was to the bank on the left. This may have been the reason for its removal although such measures are usually for economy reasons.
photo from John Mann collection Click here for Bartlow (Saffron Walden branch platform) Gallery 2: June 1964 - April 2015  Home
Page Home
Page
|

 Construction of the Saffron Walden branch started on 18th May
1863 and on 2nd June 1863 the Saffron Walden Railway Extension
Act received Royal Assent. The construction of the line was
virtually trouble free and after passing a Board of Trade inspection
on 18th November 1865 the branch to Saffron Walden opened 5
days later. The extension to Bartlow, although running through
a much hillier terrain requiring cuttings and embankments was
completed 11 months later opening on 26th October 1866
Construction of the Saffron Walden branch started on 18th May
1863 and on 2nd June 1863 the Saffron Walden Railway Extension
Act received Royal Assent. The construction of the line was
virtually trouble free and after passing a Board of Trade inspection
on 18th November 1865 the branch to Saffron Walden opened 5
days later. The extension to Bartlow, although running through
a much hillier terrain requiring cuttings and embankments was
completed 11 months later opening on 26th October 1866
 After the war the service began to deteriorate with freight
traffic back in decline following the lifting of petrol rationing.
By the early 1950's the increase in car ownership led to a dramatic
loss in passenger revenue but as several of the surrounding
lines closed the Saffron Walden branch survived and as part
of the 1955 BR modernisation plan diesel rail buses were introduced
on 7th July 1958. Despite their success the line was listed
for closure in the 1963 Beeching Report and despite a spirited
local attempt to keep the line open the passenger service was
withdrawn from 7th September 1964. Within a month of closure,
BR announced their intention to withdraw freight facilities
from 28th December 1964.
After the war the service began to deteriorate with freight
traffic back in decline following the lifting of petrol rationing.
By the early 1950's the increase in car ownership led to a dramatic
loss in passenger revenue but as several of the surrounding
lines closed the Saffron Walden branch survived and as part
of the 1955 BR modernisation plan diesel rail buses were introduced
on 7th July 1958. Despite their success the line was listed
for closure in the 1963 Beeching Report and despite a spirited
local attempt to keep the line open the passenger service was
withdrawn from 7th September 1964. Within a month of closure,
BR announced their intention to withdraw freight facilities
from 28th December 1964.